Sandblasting is the most effective method for getting steel beams to the cleanliness level coatings actually require. But results vary considerably depending on technique, abrasive selection, equipment setup, and how well operators handle the complex geometry of structural profiles.
This guide covers the full process — from pre-blast prep through the coating window — along with technique selection, key variables, and the mistakes that cause premature failures on coated steel beams.
TL;DR
- Sandblasting removes rust, mill scale, and old coatings — and creates the surface profile coatings need to bond
- Three primary methods: dry sandblasting, wet sandblasting (lower dust), and shot blasting for high-throughput shop work
- Key variables: abrasive type, grit size, nozzle pressure, standoff distance, and target cleanliness grade (ISO 8501-1)
- Sa2.5 is the standard minimum for powder coating on structural steel beams
- Coat immediately after blasting — flash rust can develop within minutes in humid conditions like Florida's
How to Sandblast Steel Beams: Step-by-Step
Step 1: Inspect and Prepare the Beam Surface Before Blasting
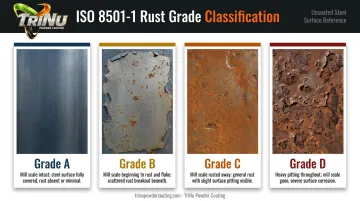
Start with a visual inspection. ISO 8501-1 defines four rust grades for uncoated steel:
- Grade A — Steel largely covered with adhering mill scale, little rust
- Grade B — Rust beginning; mill scale starting to flake
- Grade C — Mill scale rusted away, slight pitting visible
- Grade D — Mill scale gone, general pitting visible
Note weld seams, bolt holes, and flange edges. These areas need closer attention during blasting. Remove weld spatter and slag with a wire brush or grinder before blasting starts.
Degrease all surfaces before blasting. Oil or grease left on the surface will prevent the abrasive from cutting cleanly and contaminate the anchor profile beneath. Sherwin-Williams and AISC both specify removal to SSPC-SP 1 (solvent cleaning) before any blast work begins.
Finally, mask threaded holes and precision contact surfaces with rubber plugs or tape to prevent abrasive intrusion.
Step 2: Set Up Equipment and Verify Environmental Conditions
Load the correct abrasive for the beam's rust grade and target cleanliness. Verify that your compressor maintains consistent pressure throughout the job, since pressure drops cause uneven cleaning across large beams.
Check environmental conditions before starting:
- Surface temperature must be at least 5°F above the dew point to prevent moisture condensation on freshly blasted steel
- Relative humidity above 85% sharply raises flash rust risk; consider rescheduling if conditions are marginal
PPE requirements for operators include a NIOSH-certified Type CE supplied-air blast helmet, blast suit, gloves, and hearing protection. OSHA requires a formal respiratory protection program under 29 CFR 1910.134 when respirators are used.
Step 3: Execute the Blast — Technique and Sequence
On I-beams and H-beams, work systematically: web surfaces first, then flanges, weld seams last. Weld toes require closer nozzle distance and careful angle adjustment to fully remove scale and slag.
Per GMA Garnet blasting guidance, maintain:
- Standoff distance: approximately 18 inches (46 cm), adjusted by nozzle type
- Blast angle: 55–70 degrees to the substrate
- Consistent, overlapping strokes across flat surfaces
Inside corners, web-to-flange junctions, and weld toes are the most common sources of missed contamination. They require deliberate angle adjustment and closer working distance; flat-surface passes won't reach them.
Perform visual checks against ISO 8501-1 reference panels every 15–20 minutes, and mark any areas showing residual scale, streaking, or insufficient profile. Re-blast those spots before advancing — catching them here is faster than dealing with coating failures later.
Step 4: Post-Blast Cleanup, Inspection, and Coating Window
After blasting, blow off all residual abrasive and dust using low-pressure compressed air (no higher than 30 PSI). Wipe critical areas with a clean white cloth to confirm dust levels are acceptable.
Conduct a final inspection:
- Confirm the beam meets the required Sa grade (typically Sa 2.5 for powder coating applications)
- Verify surface roughness is within the range specified by the coating system
Then coat immediately. According to KTA-Tator, there's no single universal prep-to-prime interval: common specifications require priming within 4 hours, 8 hours, or within the same work shift. The rule holds regardless of spec — if visible rust forms after blast cleaning, the surface must be recleaned before coating proceeds.
In high-humidity environments like Tampa Bay, don't count on having hours. Flash rust can begin forming on freshly blasted steel within minutes when moisture is present.
Sandblasting Techniques for Steel Beams: Which Method to Use
Not every method suits every situation. The right choice depends on environment, contamination level, beam volume, and the coating system that follows.
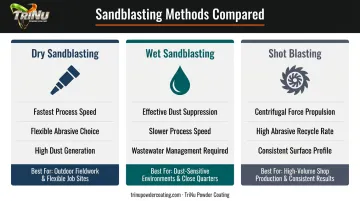
Dry Sandblasting
Dry sandblasting uses compressed air to drive abrasive media against the steel surface. It's the most common method for structural beam work in shop environments, offering fast cleaning speeds, flexible abrasive selection, and effective removal of heavy rust, mill scale, and old coatings.
The trade-off is dust. Dry blasting generates significant airborne particulate that requires proper containment, dust collection, and operator protection.
One important note: silica sand is no longer the safe choice. NIOSH published specific guidance on preventing silicosis and deaths from sandblasting, and modern shops use steel grit, aluminum oxide, or garnet instead.
Wet Sandblasting
Wet blasting introduces water into the abrasive stream to suppress dust — useful for outdoor beam work in populated areas or environments where dry blasting creates compliance problems. Water can be mixed with abrasive as slurry or injected at the nozzle for dust control.
Trade-offs to plan for:
- Slower cleaning speed than dry methods
- Requires wastewater management
- Beams must be dried or treated with a flash-rust inhibitor before coating — skipping this step trades one surface problem for another
Shot Blasting
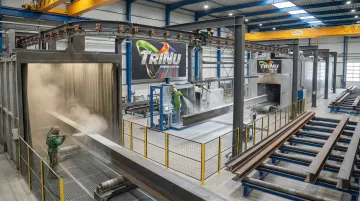
Shot blasting uses centrifugal force (spinning turbine wheels) rather than compressed air to propel steel shot or grit at the beam surface. It's the standard for processing large batches of structural steel in shop environments, offering consistent surface profiles and high abrasive recycle rates.
Wheelabrator roller-conveyor machines are designed specifically for blast cleaning beams and structural sections at production scale. For high-volume fabricators, the throughput advantage over compressed-air blasting is substantial.
Key advantages for production environments:
- High abrasive recycle rates reduce media costs over time
- Consistent, repeatable surface profiles across every beam
- Suited for continuous throughput on large structural sections
One method worth ruling out early: glass bead blasting has no place on heavy structural steel. It cannot remove mill scale or heavy rust from beams; its use is limited to lighter cleaning tasks or when a smoother finish is needed for a specific coating type.
Key Parameters That Affect Results When Sandblasting Steel Beams
Four variables control whether a blasted beam passes inspection or gets sent back: abrasive type, blasting pressure, nozzle geometry, and target cleanliness grade. Get any one wrong, and the surface prep fails — regardless of how much time you spent blasting.
Abrasive Media Type and Grit Size
Abrasive hardness, particle shape, and size control both cleaning rate and the depth of anchor profile left on the steel. A few common options:
| Abrasive | Shape | Best For | Notes |
|---|---|---|---|
| Steel grit | Angular | Heavy rust, mill scale, aggressive profiling | High cleaning rate, recyclable |
| Aluminum oxide | Blocky, sharp | Consistent profile control | Available in wide grit range (16–240) |
| Garnet | Angular | New construction, light-to-medium rust | GMA Garnet 80 mesh creates 40–55 µm profile |
Coarser grit cuts more aggressively and leaves a deeper profile. Finer grit produces a shallower profile suited to thinner coatings.
The mismatch problem runs both ways. Grit too fine for heavily scaled beams results in failed Sa grade inspections. Grit too coarse creates profiles so deep that coatings can't fully wet (bond into) the valleys — AMPP CoatingsPro notes that 4–5 mil profiles can increase primer consumption by roughly 25%.
Blasting Pressure (PSI)
GMA Garnet specifies that optimum nozzle pressure is a minimum of 100 PSI, with blasting efficiency dropping by 1.5% for every PSI below that threshold. The distinction between pot pressure and nozzle pressure matters: long hose runs and fittings create pressure losses that reduce what actually reaches the nozzle. Clemco charts show a single 90° elbow costing roughly 3 PSI, a tee about 5 PSI.
Verify nozzle pressure directly — don't assume pot pressure equals working pressure on long setups. Once pressure is confirmed, standoff distance and angle determine how that energy reaches the surface.
Nozzle Distance and Angle
Working at the right standoff (approximately 18 inches per GMA Garnet) and angle (55–70 degrees) distributes abrasive impact energy evenly across flat surfaces. Too far away and the abrasive loses velocity before it hits. Too close and you get concentrated impact, uneven profiling, and potential surface damage on thinner sections.
Inside web-to-flange junctions and weld toes require adjusted angles and closer working distances. These areas are the most common origin points for coating failures on structural beams — they simply don't get clean with the same approach used on flat web surfaces.
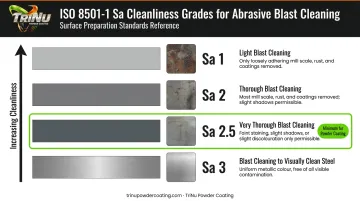
Target Cleanliness Grade (ISO 8501-1)
The Sa grading system defines what "clean" means after blasting:
- Sa1 — Light blast cleaning; poorly adhering material removed
- Sa2 — Thorough cleaning; most mill scale and rust removed
- Sa2.5 — Very thorough; only faint staining as spots or stripes remains
- Sa3 — Blast to visually clean steel with uniform metallic color
Sa2.5 is the standard minimum for powder coating on structural steel. AkzoNobel's Interpon powder coating primer specifies Sa2.5 per ISO 8501-1 with a surface roughness of Rz 42–84 µm. Applying coating over an under-prepared surface causes premature delamination — no exceptions.
Common Mistakes When Sandblasting Steel Beams
Most coating failures on sandblasted steel trace back to a short list of process errors:
- Skipping pre-blast degreasing — Oil or grease not removed before blasting traps contamination under the anchor profile. The surface can look visually clean and still fail adhesion testing.
- Wrong abrasive for the job — Using the same media for every job leads to under-cleaning on heavily corroded beams or surface damage on lighter sections. Match abrasive selection to the rust grade and target coating system.
- Waiting too long to coat — In humid shop environments, steel can begin flash rusting within minutes of being blasted. Any visible rust means the surface must be recleaned before coating proceeds.
- Missing complex geometry — Flanges, weld toes, inside corners, and bolt holes are consistently under-blasted when operators focus on flat web surfaces — and those missed spots become the starting point for delamination and rust creep.
When to Handle Sandblasting In-House vs. Hire a Professional
In-house blasting can work for small shops with light cleaning requirements, modest beam volumes, and existing compressed air infrastructure. But consistently achieving Sa2.5 or Sa3 across complex structural profiles — with documented inspection and a controlled coating window — requires equipment, containment, and trained operators that most fabricators don't maintain as a core competency.
The case for professional service gets stronger when:
- Beam volume or production pace exceeds what in-house equipment can keep up with
- The job requires a documented, inspectable surface preparation record before high-performance coatings
- No dedicated blast room or dust collection is in place
- Beams are long enough that most shops can't process them (standard shop ovens won't handle 20–30 ft structural members)
The gap between sandblasting and coating application is where most quality problems start. Every additional hand-off is an opportunity for flash rust or contamination.
Keeping both steps under one roof eliminates that gap entirely. TriNu Powder Coating processes structural steel beams — including parts up to 30 feet — through surface prep and powder coating in a single facility in the Tampa Bay area. Pick-up and delivery service is available throughout the region, so fabricators don't have to coordinate separate logistics between a prep shop and a coating facility when managing a production schedule.
Frequently Asked Questions
Can you sandblast steel beams?
Yes — sandblasting is one of the most effective and widely used methods for preparing structural steel beams before coating. The method, abrasive, and pressure settings should be selected based on the beam's rust grade, geometry, and intended coating system.
How much does it cost to sandblast steel beams?
Cost depends on beam size, rust condition, required cleanliness grade, quantity, and whether the work is performed on-site or in a shop. Shot blasting in a controlled shop environment is generally faster and more cost-effective for high volumes than compressed-air blasting. Tampa Bay manufacturers and fabricators can contact TriNu Powder Coating directly for project-specific pricing.
What abrasive media works best for sandblasting steel beams?
Steel grit and aluminum oxide are the most common choices for structural steel. Steel grit handles aggressive cleaning and deep profiles; aluminum oxide offers consistent profile control across a wider grit range. Silica sand should be avoided — NIOSH has published explicit guidance on the silicosis risk it creates.
What cleanliness grade is required before powder coating steel beams?
Most powder coating systems require a minimum Sa2.5 per ISO 8501-1 — meaning the surface must be free of visible oil, grease, scale, rust, and prior coatings, with only faint staining permitted. Always verify against the specific coating system's technical data sheet.
How long after sandblasting can you apply a coating to steel beams?
Coat as soon as possible — common specifications call for priming within 4–8 hours or within the same shift. In humid environments like Florida, flash rust can develop within minutes of blasting, so any visible rust requires recleaning before coating proceeds.
Can sandblasting damage steel beams?
Structural steel handles standard blasting conditions well. The real risk is an overly deep anchor profile — it can prevent coatings from fully wetting the surface and drive up primer consumption. Matching abrasive selection and pressure to the beam's specifications keeps the process within safe parameters.